Your bedroom is the one room in the house you see every single day, first thing in the morning and last thing at night. Yet it’s often the space that gets left behind when renovation budgets get allocated. The living room gets the new sofa. The kitchen gets the backsplash. The bedroom gets… the same tired comforter from three years ago and a lamp that flickers. Sound familiar?
A genuine budget bedroom makeover doesn’t require a contractor, a design degree, or a credit card bill that keeps you up at night. What it requires is a clear plan, smart prioritization, and knowing which changes deliver the most visual impact per dollar spent. Most people are surprised to discover that a complete bedroom transformation, the kind that genuinely changes how you feel when you walk through the door, can land anywhere between $150 and $600 depending on your starting point. That’s less than a single piece of furniture from most retail chains.
This guide walks through every layer of the bedroom, from walls to floors, textiles to lighting, furniture to finishing touches, with realistic budget ranges and a chronological plan to avoid the costly mistakes most people make when they try to tackle everything at once. Whether you’re renting an apartment, refreshing a master suite, or helping a teenager finally love their space, the principles stay the same.
Evaluating Your Bedroom and Defining Your Makeover Priorities
Before spending a single dollar, stand in the doorway of your bedroom and look at it like a stranger would. What’s the first thing that catches your eye? That’s either your biggest asset or your most urgent problem. This simple exercise, what designers call a visual audit, is where every successful makeover begins.
What’s Already Working in Your Bedroom
Good bones are worth identifying. A solid wood dresser with ugly hardware is not a problem, it’s a project. A bed frame with a neutral finish can survive a complete style overhaul just by changing what surrounds it. Natural light coming from one window can become a design feature with the right window treatment framing it. Write down what stays, because protecting those elements from unnecessary spending is half the budget game.
Identifying What to Transform First
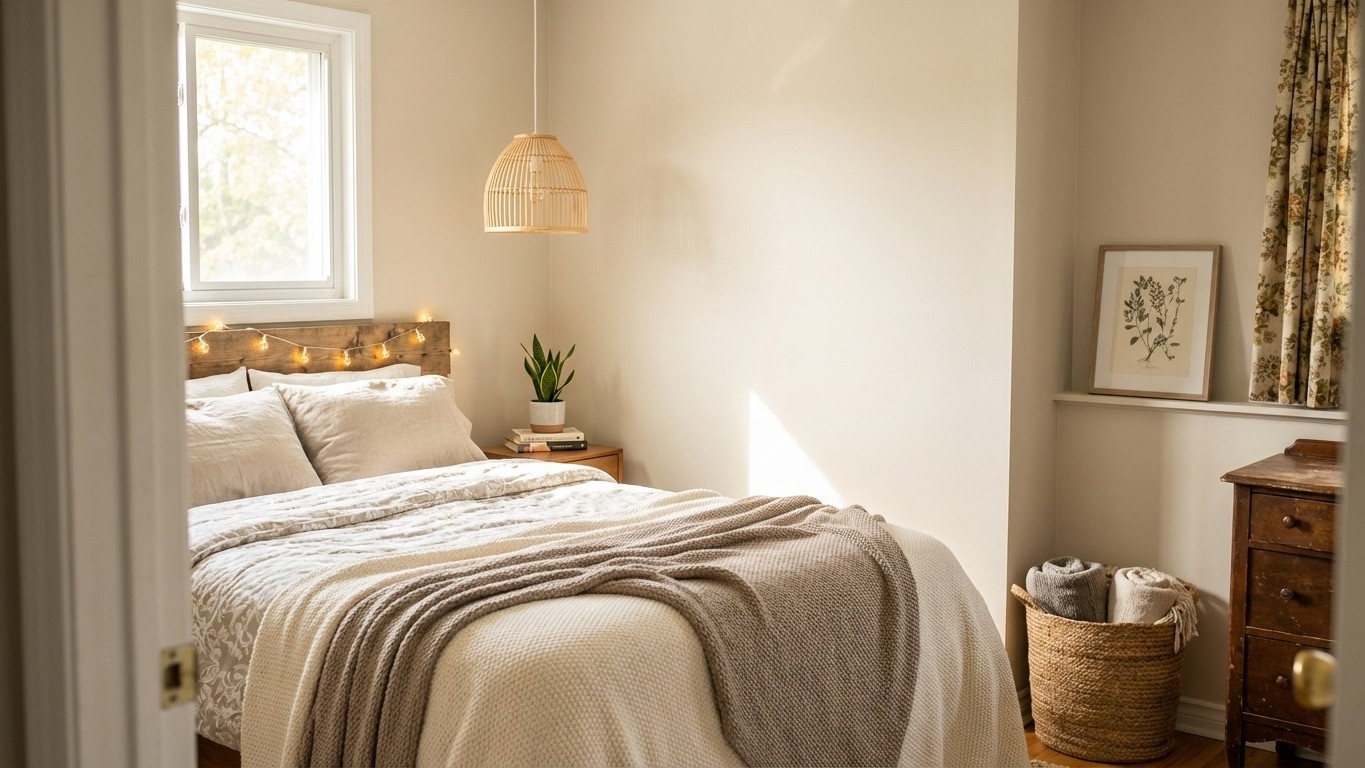
Prioritize by impact-to-cost ratio. The bed wall (the wall your headboard sits against) is the single most photographed surface in any bedroom and the one your eyes land on immediately. If you’re looking to transform this focal point without breaking the bank, consider exploring diy headboard ideas on a budget for maximum visual impact. After that, come textiles (bedding, curtains), then lighting – and an affordable bedroom lighting makeover can dramatically transform your space’s ambiance – then storage solutions like a budget closet organization makeover. Paint or wall treatments sit somewhere between first and second priority depending on your current wall color. If you’re staring at a beige that time forgot, paint moves to the top of the list immediately.
Setting a Realistic Bedroom Makeover Budget
Here’s a breakdown that actually reflects what things cost in 2026, without pretending you can transform a room for $50 in an afternoon:
- Wall treatments (paint or peel-and-stick): $40-$120
- Bedding and textiles: $80-$200
- Lighting upgrades: $50-$150
- Furniture relooking (paint, hardware): $30-$80
- Accessories, plants, mirrors: $40-$100
Total range: $240 to $650 for a complete transformation. The wider your willingness to DIY and thrift, the closer you land to that lower number. For the full picture of how bedroom budgets fit into a broader home refresh strategy, the budget home makeover guide covers the entire house with the same cost-conscious approach.
Budget Wall Transformations for a Cozier Bedroom
Walls are the canvas. Getting them right changes everything else automatically, because color and texture affect how furniture looks, how lighting bounces, and how the room feels at 10pm when you’re winding down.
Paint Colors That Create a Cozy Bedroom Atmosphere
The colors doing the most work in cozy bedrooms right now are warm taupes, terracotta-adjacent dusty pinks, soft sage greens, and deep moody tones like charcoal or navy for accent walls. The trick with paint on a budget is to paint only one wall, specifically the bed wall, rather than the whole room. One accent wall in a warm, saturated color costs roughly a quart of paint (around $15-$25) versus a full gallon, and delivers 80% of the visual impact. A Benjamin Moore or Sherwin-Williams paint swatch can tell you whether your lighting temperature (warm vs. cool bulbs) will work with the shade before you commit.
Peel-and-Stick Wallpaper: The Renter’s Best Friend
Peel-and-stick wallpaper has genuinely improved in quality over the past few years. The early versions bubbled, peeled at corners, and left residue. Current options, especially from brands focused on rental-friendly applications, hold well on smooth drywall and remove cleanly. A 20-square-foot panel set covering one accent wall typically runs $35-$80. Botanical prints, geometric patterns, and linen textures are the most popular choices for bedroom applications. For renters specifically, this is the single highest-impact change available without risking a security deposit.
DIY Accent Wall Ideas Without Major Spending
No budget for wallpaper or paint at all? A gallery wall built from thrifted frames (spray-painted to match), printed artwork from free digital download sites, and a few dried botanical elements can create a fully intentional accent wall for under $40. The key is committing to a cohesive color palette for the frames rather than mixing finishes randomly. Black frames on a white wall. Warm wood tones on a cream wall. Consistency makes the collection look curated rather than collected.
Textiles and Bedding: The Fastest Route to a Cozy Bedroom
No single element transforms a bedroom faster than new bedding. Swap the duvet, and the entire room reads differently. This is the change most interior stylists make first when staging a bedroom, and for good reason.
Affordable Bedding That Changes the Whole Room
Thread count matters less than weave type and color. A linen-look cotton duvet cover in a warm stone or muted terracotta will photograph and feel more luxurious than a 600-thread-count polyester set in stark white. Discount retailers, online marketplaces, and even outlet stores regularly carry solid-color duvet covers in natural tones for $35-$70. The trick to making affordable bedding look expensive is layering: duvet plus a folded throw at the foot, two standard shams plus two euro shams. The volume creates the luxury feeling, not the price tag. For a comprehensive list of ideas in this space, the cheap bedroom decorating ideas resource covers 25 specific approaches to bedroom styling on a tight budget.
Curtains and Window Treatments: Maximum Impact, Minimal Cost
Curtains hung high (close to the ceiling) and wide (well beyond the window frame on each side) make a room feel taller and more finished than almost any other single change. A $25 pair of linen-look panels from a discount retailer looks expensive when hung correctly. The rod should sit 4-6 inches below the ceiling, and the panels should extend 8-12 inches past the window frame on each side. Floor-length always. Even 2 inches of visible wall between the bottom of the curtain and the floor breaks the illusion entirely.
Pillows and Throws: The Art of Textile Layering
The “layered” look that makes bedroom photos so appealing is just three types of texture working together: something smooth (the duvet), something nubby or woven (a throw blanket), and something soft (a velvet or faux fur pillow). You don’t need to buy all three at once. One well-chosen throw in a complementary color, draped casually over the corner of the bed, can elevate bedding you already own. Thrift stores are genuinely excellent sources for throw blankets, often carrying near-new options for $4-$8.
Furniture Makeovers: Refresh Before You Replace
The fastest way to blow a bedroom makeover budget is buying new furniture when existing pieces could be transformed for a fraction of the cost. A tired dresser with new hardware and a coat of paint becomes a statement piece. The math is simple: a new dresser runs $200-$600. Chalk paint plus new hardware costs $25-$50 and takes a weekend afternoon.
Relooking Your Dresser and Nightstands
Chalk paint requires almost no prep work (no sanding, no priming on most surfaces) and dries to a matte finish that looks intentionally aged in the best possible way. Warm whites, sage greens, and dusty blues are all forgiving colors for furniture. After painting, replacing hardware is the detail that closes the gap between “DIY project” and “looks designed.” A set of six drawer pulls in brushed brass or matte black runs $15-$30 online and takes twenty minutes to swap. The before-and-after difference is genuinely striking.
DIY Headboard Ideas That Won’t Cost a Fortune
The headboard is the focal point of the entire bedroom. It’s also one of the most expensive individual pieces in a bedroom suite, which is exactly why making your own is so worth considering. Upholstered headboards can be built from a piece of plywood, foam padding, and fabric for under $60. A floating shelf arrangement creates a modern headboard without any woodworking. Macramé panels, vintage doors, painted murals directly on the wall behind the bed: the options are genuinely limitless and often more interesting than anything available in stores. The dedicated guide to diy headboard ideas on a budget covers 15 specific projects with step-by-step guidance.
Smarter Storage Without Buying New Furniture
Storage problems in bedrooms are rarely about lacking furniture. They’re about unoptimized existing furniture. Under-bed storage containers (flat, lidded, and stackable) can double the storage capacity of a standard bed frame. Inside a closet, a $15 shelf divider system can transform a single rod into a multi-zone wardrobe organization system. For a full deep-dive into closet transformation without a major investment, the budget closet organization makeover guide covers every angle of the problem.
Bedroom Lighting: Setting the Right Mood on a Budget
Overhead lighting is the enemy of cozy. A single ceiling fixture casting bright, uniform light from above makes a bedroom feel like an examination room. The solution isn’t expensive; it’s strategic.
Warm Ambient Lighting for a Cozy Atmosphere
Layers of light at different heights create warmth. A bedside lamp at eye level (roughly 24-28 inches from the tabletop to the floor), a string of warm-white LED lights tucked behind a headboard or along a window frame, and possibly a low floor lamp in a reading corner give the room depth that overhead lighting simply cannot replicate. String lights alone, the kind meant for outdoor use and often sold for under $12, add remarkable warmth when wound along a shelf or draped behind a sheer curtain. Bulb temperature matters enormously: 2700K is the sweet spot for bedroom warmth. Anything above 3000K starts reading as clinical.
No-Electrician Lighting Updates
Battery-operated sconces have become genuinely stylish in recent years, moving well past the cheap plastic phase into ceramic and brushed metal options that photograph beautifully. They mount with adhesive strips or a single screw, require no wiring, and can be repositioned during a makeover without any commitment. Rechargeable versions eliminate the battery replacement issue. This is especially valuable in rentals where hardwired lighting changes aren’t permitted. The complete approach to bedroom lighting on a budget is covered in depth at affordable bedroom lighting makeover.
Customizing Existing Lampshades
A lampshade from a thrift store ($2-$5) can be transformed with a coat of spray paint, a wrap of textured twine, or a hand-painted pattern. The shade determines the quality and color of light thrown into the room, so a thicker fabric shade creates softer, more diffused light than a thin white one. Trading out a stark white shade for a warm linen or rust-colored one on an existing lamp is a $3-$8 change with noticeable impact on room ambiance.
Accessories and Finishing Touches That Complete the Look
The finishing layer is where personality enters the room. It’s also where people chronically overspend, buying too many small things that compete rather than complement.
Indoor Plants: Living Decor for a Calming Bedroom
A single well-placed plant does more for a bedroom’s atmosphere than six small ones scattered around. Pothos, snake plants, and peace lilies thrive in lower light conditions (common in bedrooms) and are available at most grocery stores and garden centers for $5-$15. A trailing pothos on a high shelf, or a snake plant in a textured ceramic pot on the dresser, adds organic texture that no manufactured product can replicate. The pot matters as much as the plant: a plain nursery plastic pot undermines the look entirely.
Mirrors: Making a Small Bedroom Feel Larger
A large mirror, particularly a leaning floor mirror or an oversized round mirror on the bed wall, creates the perception of additional depth and reflects light to brighten the room. Thrift stores, Facebook Marketplace, and estate sales are consistently good sources for large mirrors at $15-$40, prices that would get you a small decorative mirror at retail. A can of spray paint in the right metallic or matte finish updates any frame style to match your room.
Choosing the Right Accessories Without Overbuying
The most common mistake in bedroom accessorizing is buying too much. A tray on the nightstand (to corral the phone, book, glass, and candle into one intentional grouping), one piece of wall art that genuinely speaks to you, and two or three considered objects on the dresser top: that’s a finished bedroom. The temptation to keep adding “just one more thing” is where budgets and aesthetics both break down.
Planning and Executing Your Bedroom Makeover
The chronology of a bedroom makeover matters more than most people realize. Doing things in the wrong order creates rework, wasted materials, and the specific frustration of having to undo something you already finished.
The Right Order of Operations
Start with walls (paint or wallpaper) before anything else is in place. Then address any furniture painting or hardware swaps while the room is still partially cleared out. Lighting changes come next, since repositioning furniture around new light sources is easier than the reverse. Hang curtains before finalizing furniture placement (the curtain rod height and position affect where the bed and dresser sit most naturally). Textiles go in last: bedding, throw pillows, rugs. Accessories and plants close the process, placed only after the full room is assembled.
Budget Mistakes That Derail Bedroom Makeovers
The most expensive mistake is impulse buying before the full plan is set. A throw pillow purchased before deciding on bedding color is often a throw pillow that doesn’t work in the final room. Buying paint in a full gallon when a quart would have sufficed costs $20-$30 unnecessarily. Purchasing new furniture before attempting to relook existing pieces is where budgets most frequently double. Going in with a firm list, and a firm “I’m not buying this yet” policy for anything not on it, saves more money than any discount.
What a Real Bedroom Transformation Looks Like
The realistic before-and-after of a $400 bedroom makeover looks like this: walls repainted in a warm sage green (one accent wall, $20 in paint), existing dresser repainted in white chalk paint with new brass hardware ($35), new duvet cover and two euro shams in a complementary linen tone ($85), floor-length curtains hung high and wide ($45), a string of warm LED lights behind the headboard ($15), a secondhand floor mirror cleaned and repositioned ($25), two plants in ceramic pots ($30), a new bedside lamp from a discount retailer ($40), and a gallery wall using printed art and painted thrift store frames ($30). Total: $325. The room that comes out of that process genuinely doesn’t look like a $325 room. That gap between spend and result is exactly what good planning creates.
The bedroom you fall asleep in affects the quality of that sleep. The room you wake up in sets the tone for the day. There’s something worth sitting with in the idea that this particular space, the most private room in your home, might deserve as much intentional attention as any other. Not because of what it looks like in photos, but because of what it feels like at 7am on a Tuesday when nothing is going particularly right. A room that feels genuinely considered, calm, and personal changes that experience in ways that are hard to quantify and surprisingly easy to create.