Poor drainage is the silent killer of balcony container gardens. You water a herb pot on a hot afternoon, feel virtuous about it, and three weeks later the basil is collapsed and turning black from the roots up. No fungus gnat infestation required, just stagnant water pooling at the bottom of a pot that had nowhere to let it go.
On a balcony, the stakes are higher than in a backyard.
For outdoor plants, some drainage is critical, especially in a rainy climate — and controlling how much rain falls into your container is difficult, if not impossible.
Add to that the confined space, the closed surfaces (concrete slabs, tile floors), and the limited airflow that characterizes most urban balconies, and you have an environment where every drainage decision matters.
This guide walks you through every layer of the problem, literally. From the holes at the base of the pot to the soil mix itself, from a small plastic planter of basil to a large wooden planter of ornamental grass, the goal is simple: water goes in, water comes out, roots breathe freely.
Why Poor Drainage Wreaks Havoc : Especially on a Balcony
Root rot, fungal diseases, and the slow decline no one notices
Overwatering is one of the most frequent mistakes in container gardening. When roots sit in too much moisture, oxygen can’t reach them, leading to root rot, fungal diseases, and poor plant performance — and this is especially common in containers without good drainage.
The cruel twist? The symptoms above the soil look exactly like underwatering.
A wilting plant gets watered. Yellowing leaves get fertilized. But watering a plant with root rot is akin to giving a drowning person a glass of water, these actions can make root rot worse.
The warning signs to watch for are specific.
Yellowing leaves at the base of the plant suggest roots are struggling to breathe. Wilting despite moist soil is a classic sign of waterlogged roots that are unable to absorb nutrients. White mold or mildew on the soil surface often signals consistently wet conditions.
Underground, the evidence is even starker:
healthy plant roots are firm and white, while unhealthy rotting roots are soft and brown, and if they’re really far gone, rotten roots are mushy black.
The urban balcony: a drainage environment unlike any other
A pot sitting on a balcony floor faces a particular set of constraints.
Healthy roots need oxygen to survive, and without proper drainage, water can collect at the bottom of your planter box, leading to root rot, fungus, and bacterial growth.
On a balcony, flat concrete surfaces create another hazard: a pot placed directly on the floor can form a near-perfect seal with the slab, cutting off airflow and preventing water from escaping even when drainage holes exist.
Placing a layer of rocks or pebbles on the drip tray and elevating the pot slightly means that when the pot drains excess water, the water in the drip tray doesn’t come into contact with the bottom of the pot, preventing the plant’s roots from being exposed to standing water.
Rain compounds this on exposed balconies. Heavy, sustained rainfall can saturate even a well-designed container in minutes.
Sudden shifts in weather, like a downpour, can affect soil moisture levels and plant health — and after heavy rainfall, you should check the soil before watering again, especially if your pots have limited drainage.
Pairing solid drainage infrastructure with how to water container plants on a balcony knowledge is what separates thriving balcony gardens from ones that just survive.
The Concrete Solutions: Holes, Layers, and Soil
Drainage holes: how many, what size, and what to do if yours are missing
The single most impactful thing you can do for pot drainage costs nothing. Every container growing plants outdoors needs at least one drainage hole — full stop.
Wood, clay, or terracotta materials are porous and also absorb some moisture, so one drainage site is usually sufficient. Glazed terracotta pots, fiberglass, plastic, glass, and metal containers are different, they’re not porous, and although one hole is enough for a planter 6 inches or smaller, three or more holes for water to escape through are necessary for larger pots.
For practical sizing guidance:
the number of drainage holes needed will vary based on the overall size of the planter, but a good rule of thumb is a minimum of two drainage holes; for a 36-inch planter, 3-4 drainage holes are recommended.
Spacing matters too, if you need more than one drain site, be sure they’re evenly spaced to allow uniform drying of the soil.
No holes in your pot? Drill them. For plastic, a standard ½-inch drill bit works fine. For terracotta or ceramic, the technique requires more care:
using a drill with a diamond-tipped hole saw bit and a little water, you can drill through ceramic. Start by pouring a small amount of water on the spot to prevent overheating, place your drill bit at about a 45-degree angle until you get a good start, then stand the bit up straight and apply a little pressure until your bit drops through to the other side.
One often-overlooked detail: even a perfectly drilled pot can lose its drainage function if placed flat on concrete. Always elevate pots on feet, small pebble layers under the saucer, or purpose-built risers to maintain airflow at the base. Check also that
you never cover the drainage hole with soil, always ensure that your drainage hole is clear to allow for proper water flow.
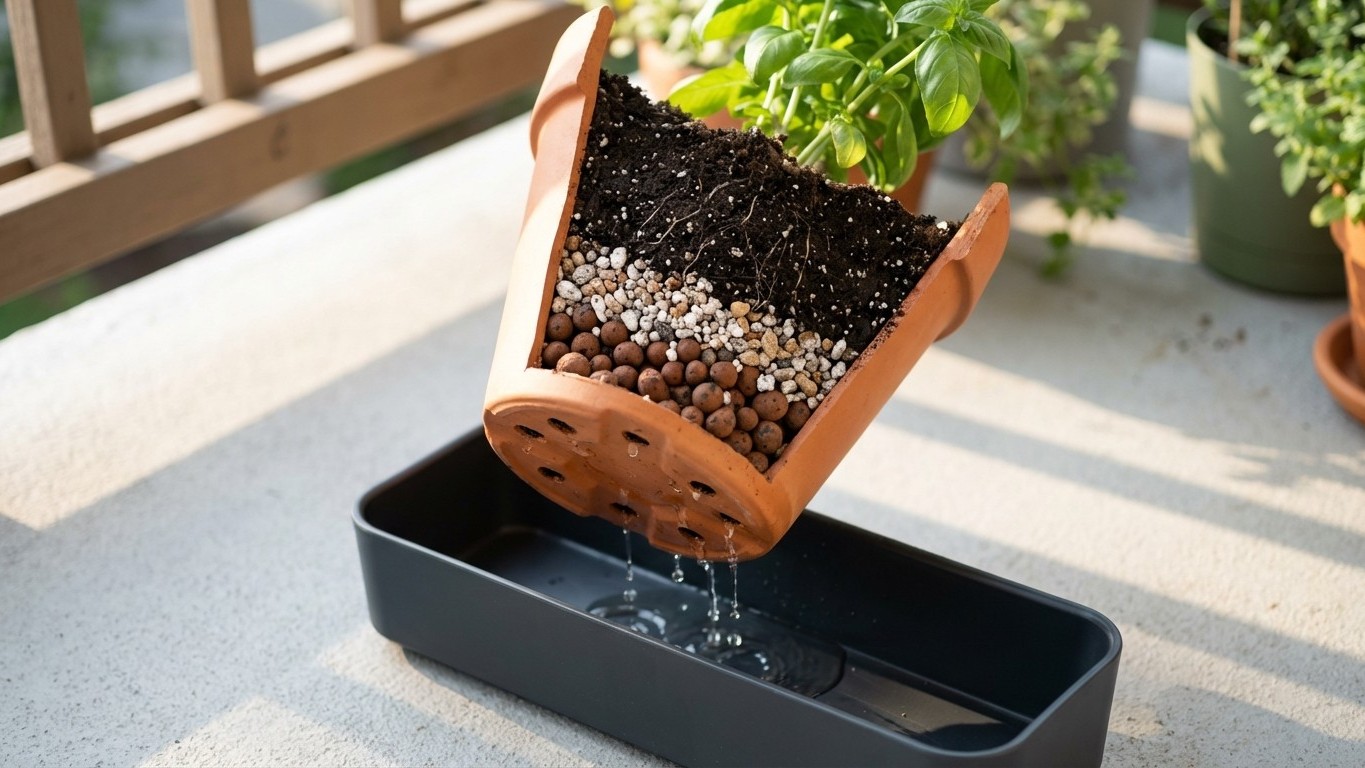
The clay pebbles debate: science versus garden lore
Here is where decades of gardening advice collide with modern soil science, and the result may surprise you. The classic instruction, add a layer of gravel or clay pebbles at the bottom of the pot before filling with soil — is, at best, misunderstood, and at worst, counterproductive.
It’s a common myth that we should put gravel or other coarse-textured material in the bottom of a container to improve drainage. It seems intuitive that it should work, but our intuition is wrong.
The physics behind it:
a well-watered container of potting mix always has a saturated layer at the bottom. When you put a layer of gravel at the bottom of the pot, the saturated layer simply moves up. The layer of gravel actually reduces the usable depth and brings the saturated soil layer closer to the plant’s roots, because water does not move easily from a layer of fine-textured material to a layer of coarse-textured material.
Studies comparing pots with and without gravel layers have shown that those with gravel retain 15–25% more moisture in the root zone, further stressing plant health.
The gravel layer also reduces available root space and, on a balcony where you’re already managing weight constraints, adds unnecessary heft.
A layer of gravel or pot shards at the bottom of a container adds unnecessary weight because it is heavier than most lightweight potting soils and becomes hard to move.
There is, however, a legitimate and narrow use for clay pebbles: placed in the saucer beneath the pot, they elevate the container above standing water and improve humidity around the plant’s foliage. That’s an entirely different application, and a genuinely useful one for balcony gardeners.
What actually works: amending your soil, not just the bottom layer
The most effective drainage improvement happens throughout the entire volume of the pot, not just at the base.
Your plants will be happier if you uniformly increase the drainage of the soil itself. Choose high-quality potting soil that drains well, and if your plants need even more drainage, instead of putting gravel in the bottom of your pot, try mixing perlite or organic matter into your potting soil to increase drainage throughout the pot.
Perlite is the key ingredient here.
Because of its porous structure and neutral pH, perlite improves aeration and drainage, making it one of the most valuable soil amendments for any soil mix or growing medium. Whether you’re planting in containers, garden beds, or raised beds, perlite offers excellent results — it keeps the soil light and fluffy, helps with water retention, and prevents waterlogging, which are key factors for healthy root growth.
Critically for balcony gardeners:
perlite prevents soil from becoming too heavy while ensuring proper drainage, and it also reduces the overall weight in water, making pots easier to move and manage.
A practical starting ratio:
a standard ratio is 1 part perlite to 3 parts potting soil. You can use up to a 1:1 ratio of perlite to soil for plants that need even better drainage, such as succulents.
Perlite also has a durability advantage over organic amendments:
perlite is inorganic and doesn’t decompose over time, unlike organic matter such as peat moss or compost, soil with perlite maintains structure season after season.
To prevent soil from washing out through drainage holes without resorting to gravel, use a small piece of horticultural felt, a coffee filter, or a fine mesh screen directly over the hole.
A coffee filter, a small piece of mesh, or landscape fabric over the holes keeps the soil in but lets water out freely, without interfering with drainage the way gravel does.
The right best soil mix for balcony container gardening can make the difference between a system that works from day one and one that compacts and clogs within a season.
Matching Your Drainage Setup to the Pot and the Plant
Container material changes the game entirely
Not all pots drain the same way, even with identical holes and soil mixes. The container material itself is a drainage variable.
The porosity of clay allows air and moisture to penetrate the sides of the pot — this moisture and air is utilized by the fine roots located at the edge of the soil ball. Clay pots also act like a wick to remove excess moisture from the potting soil.
That passive wicking action makes terracotta forgiving for heavy-handed waterers, but it also means plants dry out faster, something to account for on a sunny, windy balcony.
Plastic and glazed containers behave differently.
Plastic does not have the wicking action that clay has, making it an excellent choice for moisture-loving plants or for those gardeners who water infrequently.
The tradeoff: any excess water that enters a plastic pot has only one exit, the drainage holes. This makes precise hole sizing and soil quality more important with plastic than with terracotta.
Metal containers deserve special attention on balconies.
Metal is non-porous, so drainage is a major consideration — make sure you are able to drill adequate holes in the container.
Dark-colored metal pots can also heat the soil dramatically in summer, stressing roots in ways that mimic overwatering symptoms. For wood containers, drainage is generally good, but the wood itself can rot over time, a problem that gets worse if the base sits in pooled water, another argument for always elevating pots.
For container gardening small space balcony urban situations,
plastic and fiberglass pots are a great choice for balcony gardeners, they’re lightweight so you can move them around more often and they hold up well against water loss and frost.
Big pot, small pot: the drainage logic shifts
A 6-inch herb pot and a 24-inch planter of tomatoes present entirely different drainage engineering challenges. Small pots dry out quickly and benefit from soil with slightly higher water retention. Large pots, on the other hand, hold an enormous volume of substrate that can stay saturated at the core for days after watering.
If you have a slightly large pot or are repotting a variety with shallow roots, you can reduce its depth by adding pebbles to the bottom — this way, your plant won’t be lost in an oversized container (which is likely to remain damp), and you won’t have to buy a new pot.
This is the one legitimate use case for clay pebbles at the base: adapting container depth to root depth, not for drainage per se, but for volume management.
For herbs, thyme, rosemary, oregano, basil, choose containers that are slightly on the smaller side for the root system, fill them with a perlite-enriched mix, and ensure at least two drainage holes. These plants genuinely prefer lean, well-drained conditions. Tomatoes and peppers in large containers need robust drainage infrastructure: multiple holes, perlite-amended soil, and a deliberate watering schedule that checks soil moisture before adding more water. Learning how to water container plants on a balcony in tandem with drainage setup is what transforms a struggling balcony garden into a productive one.
Maintaining Drainage Over Time: What Most Guides Forget
Setting up drainage correctly at planting time is only half the work. Drainage degrades. Soil compacts, roots fill the pot, organic material breaks down, and holes clog with debris.
Inspect and clean the drainage systems at the start of the growing season to remove any debris that may have accumulated during winter.
The simplest drainage check: water the pot thoroughly, then time how quickly water appears at the drainage holes. Clear flow within 30–60 seconds of saturation is a good sign. Water that takes several minutes to appear, or never appears at all, signals compaction or a blocked hole. At that point, gently probe the holes from below with a thin skewer or toothpick to clear any debris, soil, root fragments, and mineral buildup are the usual culprits.
To check if the soil itself has compacted over time, push your finger two to three inches into the substrate.
If it feels dry, it’s time to water. If it’s still moist, hold off. Water thoroughly, letting it drain out the bottom, and then let the plant rest until the topsoil dries out again.
If the soil has pulled away from the pot walls (a sign of shrinkage and hydrophobia), water is running straight down the gap and out the hole without hydrating the root zone, a different problem, but equally worth catching early.
Horticultural felt placed over drainage holes, rather than gravel, tends to clog faster and benefits from seasonal replacement. Coffee filters, while convenient, can degrade within a single season and should be replaced each time you repot. The ideal approach is a small piece of fine mesh screen, durable, reusable, and it holds soil without impeding flow.
FAQ: Common Questions and the Pitfalls to Avoid
Can you grow plants in a pot without drainage holes on a balcony?
Technically yes, practically no — at least not outdoors.
If your planter doesn’t have a drainage hole, we don’t recommend placing it outside. Rain and other inclement weather will flood your plant and cause root rot from overwatering.
For decorative containers without holes, the best workaround is double-potting:
place your plant in a smaller, properly designed pot with drainage holes inside the decorative one, this method allows you to remove it for watering and ensures excess water drains away from the plant’s roots.
What about self-watering pots?
Self-watering containers are a specific and useful exception to many of these rules. They work on a reservoir system where the plant wicks water upward from below, rather than draining downward.
The drainage layer is incompatible with watering from below — the mineral material prevents water from rising up into the pot by capillary action, which means you must water from above.
In a true self-watering pot with an integrated reservoir, the gravel and drainage layer question is essentially moot, the system manages moisture differently by design. These work particularly well for herbs and salad greens on balconies that receive irregular attention.
What about balcony-specific anti-waterlogging strategies?
Beyond the pot itself, the placement system matters. Keep saucers under outdoor pots during dry weather and remove them (or add a layer of pebbles inside them) during rainy periods.
Adding sand, perlite, or pumice to your potting mix promotes better airflow and drainage around the roots, a worthwhile annual refresh if your existing soil has compacted over one or two seasons. Group pots on slatted platforms or grids rather than directly on solid tile, and you immediately improve the drainage environment for the entire collection.
The one rule that overrides every other: good drainage cannot compensate for bad watering habits, and good watering habits cannot fully compensate for bad drainage. They work together or they fail together. If you suspect your pot setup is limiting your plants’ potential, starting from the bottom, literally, is always the right call.