A robin had gotten in. Not a metaphor, an actual robin, fluttering in frantic circles just inches above the strawberry plants, its orange breast catching the early morning light. The netting had created a perfect trap, and I had built it myself. That moment changed how I approach protecting my strawberry bed every single spring.
Draping bird netting directly over low-growing plants sounds like a logical shortcut. You skip the stakes, the hoops, the whole engineering exercise. You just toss the net over the plants and weight the edges with rocks or soil. Five minutes of work. The problem is that birds, especially robins and starlings, don’t read instructions. They land on the netting, it sags under their weight, and suddenly they’re feeding comfortably through the mesh, or worse, walking underneath where the fabric has pooled loosely against the ground. What was supposed to protect the strawberries becomes a dining canopy.
Key takeaways
- A robin caught underneath netting exposed a widespread gardening mistake that reduces bird protection to only 40-60%
- Flat-draped netting creates hidden dangers for beneficial garden wildlife like snakes, toads, and hedgehogs
- A simple hooped cage structure solves every problem—and takes less than an hour to build
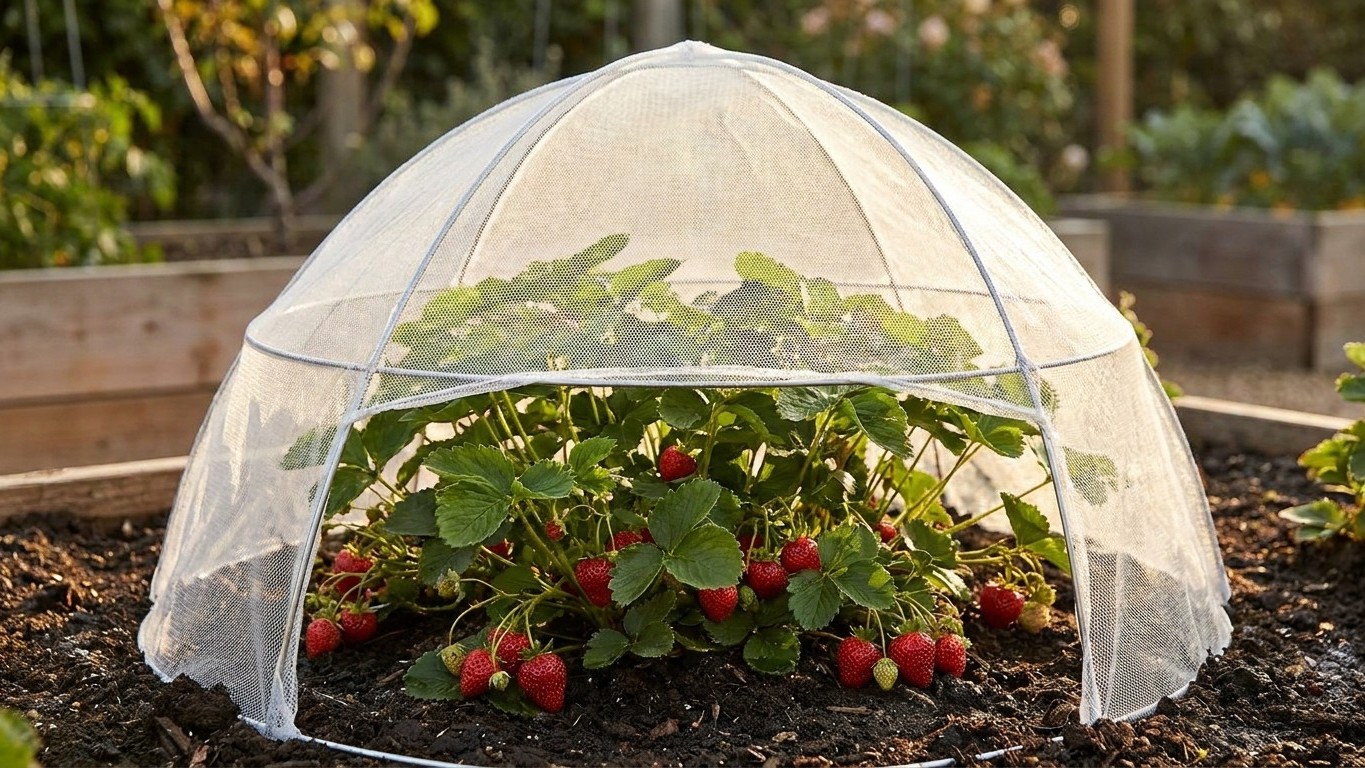
What “direct draping” actually does to your strawberry bed
The netting itself isn’t the issue. The issue is contact. When netting lies flat against plants, it creates pressure points where birds can peck directly through the mesh. A strawberry poking against the underside of the netting is fully accessible to any bird patient enough to probe through a gap. Research on small-fruit protection from university extension programs in the Pacific Northwest consistently shows that flat-draped netting reduces bird damage by roughly 40 to 60 percent, meaningful, but far from the complete protection most gardeners expect.
There’s a second problem that most tutorials gloss over: snakes and toads. In May and early June, ground-level netting becomes a trap for beneficial garden wildlife. Garter snakes, which actively hunt the slugs that devastate strawberry beds, get fatally tangled in polyethylene netting with alarming frequency. A Royal Society for the Protection of Birds advisory has long flagged garden netting as one of the leading causes of preventable wildlife casualties in domestic gardens, and while that guidance originates in the UK, the biology is the same on this side of the Atlantic. Hedgehogs there, opossums and toads here.
The robin I found that morning was unharmed : I lifted the netting gently and it bolted immediately. But it rattled me enough to spend the rest of that day rethinking the entire setup.
The hooped cage solution, and why it’s worth the extra hour
The fix is structural. Creating a tent-like frame that holds the netting several inches above the plant canopy solves nearly every problem at once. Birds can’t reach through, beneficial insects can still pollinate through the mesh openings (standard bird netting with half-inch to one-inch openings works well), and ground-level wildlife isn’t caught in pooled fabric. The netting becomes a cage, not a blanket.
For a standard 4-by-8-foot raised strawberry bed, you need six to eight semi-circular hoops made from half-inch PVC pipe or flexible rebar. Push the ends about six inches into the soil at one-foot intervals along each long edge, creating a tunnel shape. Drape the netting over the top, pull it taut, and secure the edges with garden staples or U-pins pressed into the soil every twelve inches. The whole structure takes about 45 minutes the first time and under 20 minutes once you’ve done it before, you reuse the same hoops year after year.
One detail that makes a real difference: leave the short ends of the tunnel partially open or use Velcro-attached flap panels. You’ll need to reach in for daily harvesting once the fruits start ripening, and wrestling with a fully pinned enclosure every morning gets old fast. The Velcro panel trick, borrowed from row cover techniques used in market gardening, keeps the structure intact while making access effortless.
Timing matters more than most guides admit
May is actually the right month to install protection, but the trigger shouldn’t be “it’s May.” It should be the moment you see the first white flowers opening on your Strawberry plants. That’s when birds start paying attention. Robins and mockingbirds will monitor ripening fruit from the flower stage onward, establishing a mental map of where the food source is. Getting the cage up before the flowers fade gives you a head start on that behavioral cycle.
There’s also a soil temperature angle worth knowing. May soil in most of the continental U.S. sits between 55 and 65 degrees Fahrenheit, which is prime territory for pill bugs, earwigs, and slugs, all of which will exploit the humid microclimate that forms under flat-draped netting. A raised cage structure allows better airflow around the plants, reducing the moisture buildup that draws those pests in the first place. The netting protects from above; the airflow protects from below.
For gardeners dealing with particularly aggressive bird pressure, a yard near water, or a neighborhood with a large crow or starling population — a secondary layer of protection makes sense. Reflective tape strung at intervals above the cage acts as a visual deterrent. Old CDs hung from nearby stakes work on the same principle. Neither is a permanent solution since birds habituate to static visual cues within a few weeks, but during the three-to-four-week peak harvest window, the combination of physical cage and visual deterrent covers most scenarios.
The netting I used that first morning was technically fine : 28 grams per square meter, the right mesh size, UV-stabilized so it won’t degrade in a single season. The failure was entirely about installation. A well-made cage built from the same netting will last four to five growing seasons with basic end-of-year storage. Over time, the per-season cost drops to almost nothing, and you stop finding birds in places they shouldn’t be at six in the morning.