Creating a perfect two-tone wall seems Without-this-one-simple-trick-before-freezing-weather”>Without-any-effort”>Without-damaging-fabric”>Simple in theory, yet countless homeowners end up with wavy lines, paint bleeding, and that frustrating “almost perfect” result that screams amateur hour. The difference between a professional-looking accent wall and a DIY disaster often comes down to one crucial element that most painting tutorials completely overlook: the type of tape you choose.
While Everyone-thinks-i-renovated-my-entire-entryway”>Everyone focuses on paint quality, brush selection, and color combinations, the real game-changer lies in understanding that not all painter’s tape is created equal. The standard blue tape sitting on hardware store shelves might work for basic masking, but When You’re aiming for that razor-sharp line between two colors, you need something entirely different.
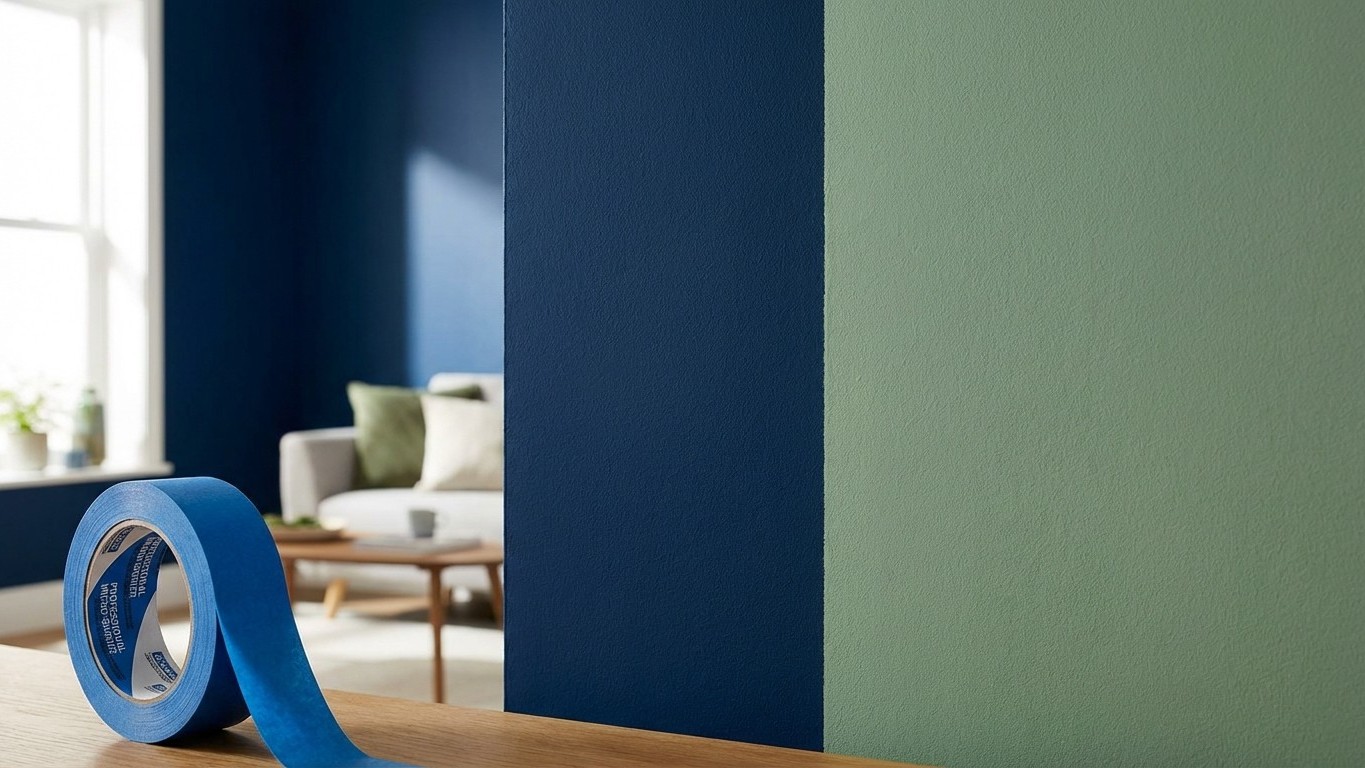
Why Traditional Painter’s Tape Fails Two-Tone Projects
The problem with conventional painter’s tape isn’t immediately obvious. It adheres well enough to prevent major spills, but its edge isn’t designed to create a perfect seal against paint seepage. The adhesive formulation allows microscopic gaps where paint can creep Underneath, and the paper backing can lift slightly when wet paint is applied, creating those dreaded uneven edges.
Professional painters have long known this Secret, but it rarely makes it into mainstream DIY advice. They use a specific type of tape engineered for precision work: delicate surface painter’s tape with micro-barrier edges. This specialized tape features a unique adhesive that bonds more completely to the wall surface while remaining Gentle enough not to damage paint when removed.
The micro-barrier technology is where the magic happens. Unlike standard tape edges that can allow paint to seep through, these advanced tapes create a molecular-level seal against the wall. The result is a barrier so complete that even thin, flowing paints cannot penetrate underneath.
The Professional Application technique
Temperature and timing also play crucial roles. Applying tape to a completely clean, dry surface at room temperature ensures optimal adhesion. Many DIYers make the Mistake of taping right after cleaning walls with damp cloths, not realizing that residual moisture prevents proper tape bonding.
The removal process is equally critical and often misunderstood. Professional painters remove tape while the paint is still slightly tacky, not completely dry. This timing prevents the paint film from bonding to the tape and potentially peeling away when removed. The sweet spot is usually 30-60 minutes after painting, depending on paint type and environmental conditions.
Beyond the Tape: Supporting Techniques for Perfect Results
While the right tape is Essential, successful two-tone walls require a holistic approach. Base coat preparation cannot be overlooked – using a high-quality primer Creates-the-same-stunning-effect”>Creates-the-same-stunning-effect”>Creates-the-same-stunning-effect”>Creates a uniform surface that helps both the tape adhere Better and the topcoat apply more evenly. Many painting failures can be traced back to skipping or rushing the primer application.
Paint consistency also matters more than most realize. Thinning paint excessively increases the likelihood of seepage, even with premium tape. Following manufacturer recommendations for consistency ensures optimal coverage without compromising the clean line you’re working to achieve.
The direction of paint application near tape edges requires attention too. Rolling or brushing away from the tape edge, rather than toward it, prevents paint buildup along the barrier that could cause bleeding or uneven texture when the tape is removed.
Choosing Your Battle: Which Walls Benefit Most
Not every wall benefits equally from two-tone treatment, and understanding which spaces work best helps ensure your effort pays off. Accent walls Behind beds, dining room focal points, and bathroom vanity areas typically showcase two-tone painting most effectively because they have clear boundaries and serve as natural focal points.
Rooms with complex architectural details or multiple windows can make two-tone painting more challenging and potentially overwhelming. The key is choosing walls with clean lines and minimal interruptions where your perfect tape line can truly shine.
The investment in professional-grade tape might seem excessive for a single project, but the difference in results justifies the cost. A roll of premium micro-barrier tape typically costs three to four times more than standard painter’s tape, but it transforms an uncertain DIY project into a confident home improvement win. When you consider the time saved from not having to touch up bleeding lines and the satisfaction of achieving truly professional results, that extra cost becomes an investment in both your home’s appearance and your own sense of accomplishment.
Your two-tone wall project doesn’t have to join the ranks of “almost perfect” DIY attempts. With the right tape and proper technique, you can achieve those crisp, clean lines that make guests ask if you hired a professional painter.