Irises are some of the most rewarding perennials in the American garden, until suddenly they aren’t. One season they dazzle with those ruffled, velvet-edged blooms. The next? Nothing. Just a tangle of sword-shaped leaves and a gardener left wondering what went wrong. Nine times out of ten, the answer is sitting right on the soil surface: mulch, piled too thick, straight over the rhizomes.
The mistake is completely understandable. We mulch everything. We’ve been told mulch conserves moisture, suppresses weeds, and improves soil health, all true for most plants. The problem is that bearded irises, the most common type grown across U.S. gardens, are not most plants. Their thick, fleshy rhizomes are designed to bask in sunlight. They need heat to ripen properly, a process called “curing,” and that solar exposure is what triggers the hormonal chain reaction leading to flower bud formation. Cover those rhizomes with even two inches of bark chips or straw, and you’ve essentially buried the plant’s engine.
Key takeaways
- The gardening advice that works for most plants is actively destroying your iris blooms—and you might be doing it right now
- Your iris rhizomes are slowly rotting under that mulch, and the damage might already be hidden beneath the soil surface
- The solution is simpler than you think, but acting fast matters if rot has already started
Why Rhizomes Need to See the Sky
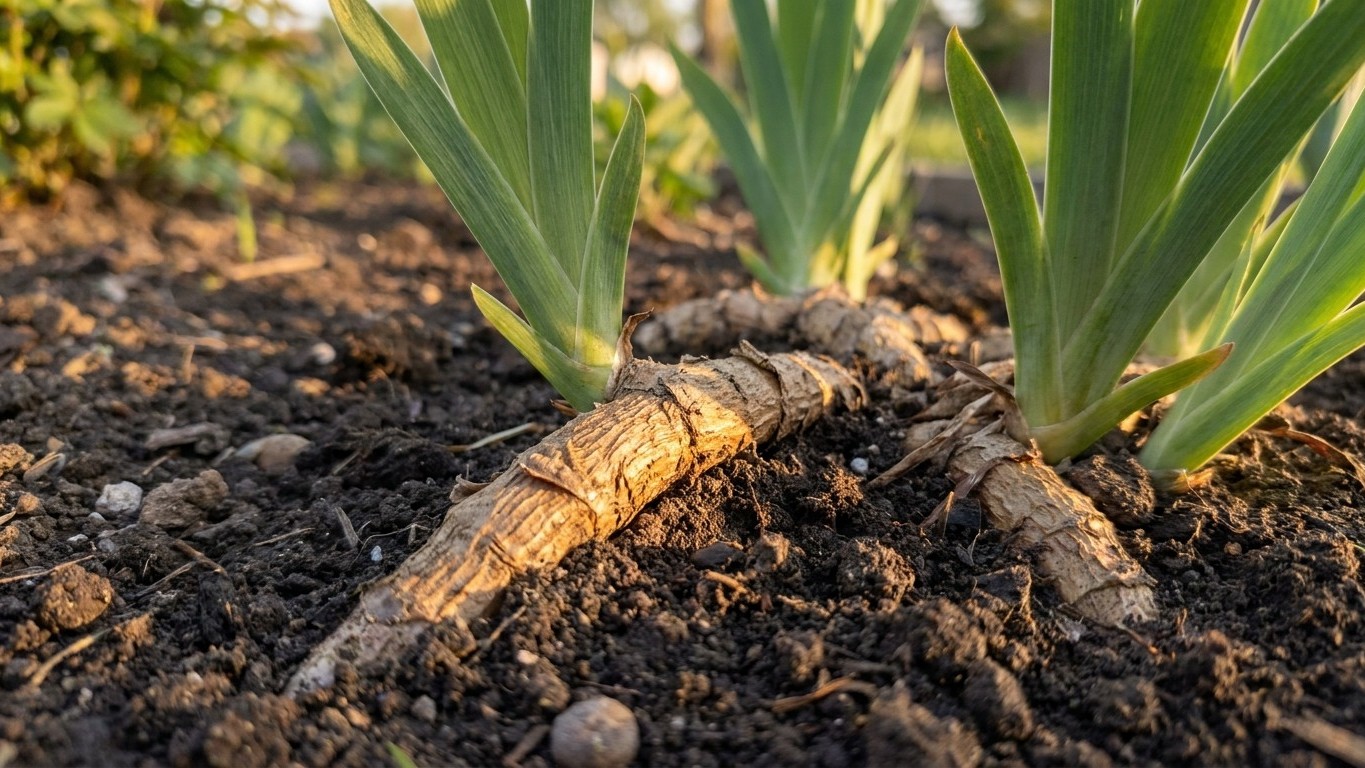
A rhizome isn’t a root. It’s a modified stem that stores energy and coordinates the plant’s growth cycle. For bearded irises specifically, the top surface of the rhizome should be at or just above soil level, exposed to the sun, slightly baked by midsummer heat. This warmth signals the plant to set next year’s bloom spikes. Gardeners who have recently moved from growing hostas or daylilies often make the mulching error simply because those plants welcome it. Irises punish it.
The secondary issue is rot. When rhizomes stay moist and shaded under a layer of organic mulch, they become prime real estate for bacterial soft rot, one of the most destructive iris diseases. The tissue turns mushy, brown, and foul-smelling, and by the time you notice it above the mulch line, the damage is often already deep. A University of Missouri Extension guide on iris care specifically warns against mulching over rhizomes for this reason, recommending that the top third of the rhizome remain uncovered at all times.
There’s a compounding factor that most gardening guides don’t mention: heavily mulched irises don’t just fail to bloom, they also decline more quickly. The rhizomes divert energy into sending leaves upward through the mulch layer rather than building the lateral offshoots that eventually become new blooming fans. You end up with taller, sometimes yellowish foliage, zero flowers, and a clump that’s quietly rotting from the center outward.
The Actual Rules for Mulching Around Irises
Mulch isn’t the enemy, misplacement is. You can absolutely mulch the pathways between iris clumps, and applying a thin layer around the outer edges of a bed during winter in colder climates (USDA zones 3–5) can protect feeder roots from freeze-thaw heaving. The key word is “around,” not “over.” Keep a clear radius of at least six inches from the base of each fan where the rhizome sits. The soil in that zone should be visible, relatively bare, and ideally south-facing to catch maximum sun exposure.
If you’ve already applied a thick mulch layer this spring, it’s not too late to fix it, provided you act before the heat of summer locks in any existing rot. Pull the mulch back carefully, check the rhizomes for soft spots or discoloration, and let the surface air dry for a day or two. Any firm, healthy rhizome that was smothered can often recover if given proper conditions quickly enough. Rotted sections should be cut away cleanly with a sterilized knife, dusted with sulfur powder, and allowed to callous before being re-covered with any soil.
One useful visual check: when you look at your iris bed from a low angle in bright sunlight, you should be able to see the tops of the rhizomes catching the light like half-submerged logs in a shallow stream. If you can’t see them at all, something is covering them that shouldn’t be.
What High-Bloom Iris Beds Actually Look Like
Visit any serious iris grower’s garden in late spring and you’ll notice something that strikes most visitors as almost neglectful: the soil around the plants looks bare, even a little rough. No tidy mulch blanket. Maybe a few weeds that get hand-pulled periodically. The rhizomes are visible, slightly tan from sun exposure, arranged in neat rows or loose clusters depending on the variety. It looks unfinished by contemporary landscaping standards, which probably explains why so many well-meaning gardeners cover them up.
The American Iris Society recommends dividing clumps every three to four years, which is also the moment to reassess spacing and sun exposure. Crowded, shaded, or mulch-smothered clumps almost always bloom poorly regardless of other care. Division resets the clock, each newly planted rhizome, set shallowly with its back in the sun, essentially starts fresh.
Reblooming iris varieties, which have become increasingly popular in recent years and can produce a second flush of flowers in late summer or fall, are even more demanding about rhizome exposure. Their additional bloom cycle requires an even more intense curing period, meaning that any mulch interference hits them harder than it would a once-blooming type. If you’ve been disappointed by a rebloomer that only reblooms once every few years, buried rhizomes are the first thing to investigate.
A detail worth keeping in mind: irises planted in full shade rarely bloom well regardless of mulch, but irises planted in full sun with smothered rhizomes will consistently outperform shaded ones in foliage while matching them in bloom failure. The light reaches the leaves. The heat never reaches the rhizome. Same result, different cause, which is why diagnosing iris problems from the leaves alone almost always sends gardeners chasing the wrong fix.