
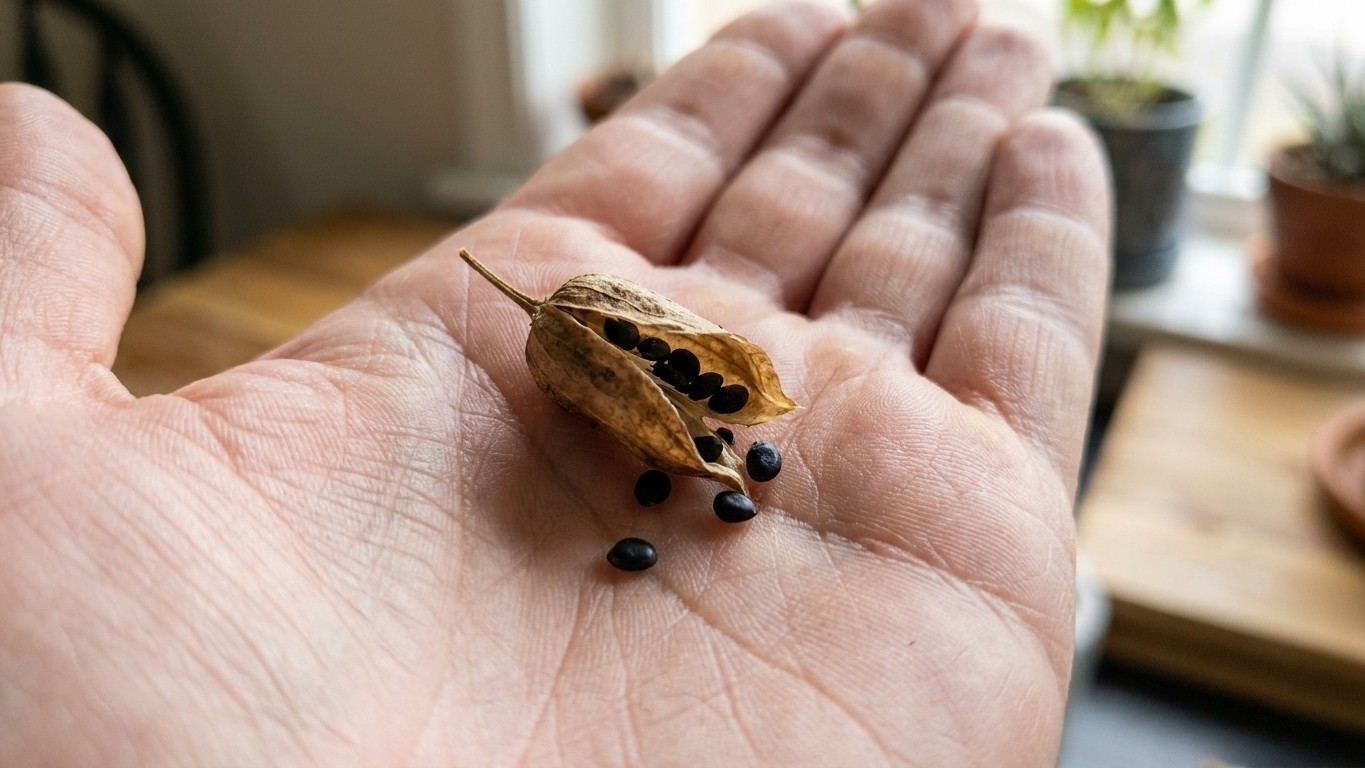
Brown pods on the flower spike don’t automatically mean black seeds inside. That single detail explains why so many home gardeners cut their basil seed heads at exactly the “right” moment, only to sow a tray of duds the following March. The visual cue that looks like a green light is often just the first blush of maturity, not the finish line.
Here’s the mechanism nobody warns you about: basil pods can turn tan or light brown while the seeds tucked inside are still pale, soft, and immature. You need to wait until the seeds have turned black inside the brown seed head, because if you harvest white or green seeds they are not mature and will not produce plants. A spike that “looks ready” from three feet away can still be hiding a batch of seeds that never got the chance to finish developing. Snip too early, and you’ve essentially harvested unripe fruit and called it a crop.
Key takeaways
- That brown pod you harvested in September? The seeds inside were probably still white and immature
- The real ripening happens after the color changes—sometimes weeks after—and most gardeners quit watching too soon
- There’s a zero-cost trick that takes 30 seconds and would have told you everything before you wasted months waiting
Why the Calendar Matters More Than the Color
Basil doesn’t rush this part of its life cycle. Pods need enough time to fully mature and ripen after flowering, and this process can take six to 12 weeks to complete. That’s not a typo. Two to three months, depending on how you count from first bloom, for a plant most people associate with a six-week salad garnish. Some sources put the seed-ripening window a bit tighter, noting that after flowering, basil seeds typically take about 2-3 weeks to mature, but even that shorter estimate assumes the flowers were fully pollinated and the plant had steady warmth the whole time. A cool snap, an early cut, or a rushed judgment call based on outer color, and the clock resets without you realizing it.
The gardener in this scenario likely fell into a timing trap that’s almost universal among first-time seed savers: watching the flower head brown at the tip while the base of the spike, where pollination happened later, was still green. Waiting until the entire flower stalk is brown ensures the seeds are fully mature, and only then should you snip off the entire bunch from the base of the stalk. Cut the moment the top looks done, and you’re statistically harvesting a mixed batch, some viable, most not.
The Part Nobody Skips (But Everybody Rushes)
Cutting the spike is only step one. What happens in the two weeks after the cut decides whether those seeds will sprout at all next spring. Once the flowers are spent, cut flower heads should sit in a warm, dry location inside the home for a few more days, since this extra drying time ensures the seeds are completely dry and less prone to mold or damage. Skip this curing stage, or store the spike while it’s still faintly damp, and you introduce a second failure mode entirely separate from immaturity: rot. A seed can be perfectly mature and still die over winter if moisture got trapped alongside it in an envelope or jar.
This is where a lot of “I did everything right” stories quietly fall apart. Gardeners crush the pods, bag the seeds, and tuck them away, satisfied. But placing harvested seed pods into a brown paper bag and keeping it hanging in a dry, well-ventilated area for about a week allows the pods to dry completely and makes seed extraction easier. A paper bag breathes. A sealed plastic container doesn’t. That difference alone can be the line between a spring tray full of seedlings and a tray of nothing.
Fixing It Before Spring Actually Arrives
The cruelest part of this mistake is the timing of the discovery. You don’t find out your seeds were duds in October, when you could still salvage the season by buying a replacement packet and starting fresh indoors. You find out in April, staring at bare soil where sprouts should be, with the entire early growing window already gone. That’s the real meaning behind “too late”: not that the seed itself expired, but that the mistake only becomes visible after the calendar has moved past the point where you can fix it cheaply.
There’s a simple insurance policy against this: test a small batch before committing the whole season to it. Scatter ten or fifteen seeds on a damp paper towel in late winter, fold it into a bag, and check in a week. Basil seeds typically take 5 to 10 days to germinate under optimal conditions, including a soil Temperature of 70°F to 85°F, consistent moisture, and exposure to light. If nothing has sprouted by day twelve, you know your saved seed is unreliable, and you still have weeks left to order fresh seed before the outdoor planting window closes.
It’s also worth remembering that properly matured, properly dried basil seed isn’t fragile once you get the process right. Store the dried seeds in a cool, dry, and dark place for up to five years, labeling them with the harvest date for easy planting later. The plant genuinely wants to help you here, one healthy spike can produce hundreds of seeds, far more than most gardeners actually need for next year’s pots. The failure almost never comes from basil being a difficult seed to save. It comes from confusing “the pod changed color” with “the seed is ready,” two events that can be separated by several more weeks than most people expect.
One extra detail worth filing away: seed color is the only test that doesn’t lie. Crack open a single pod before you commit to harvesting the whole spike. If you’re unsure whether the seeds are mature, open one seed pod to check, since mature seeds are black while immature seeds are white or light green. Thirty seconds with a fingernail on one pod would have told the whole story last September, long before spring ever had the chance to deliver the bad news.
Sources : evergreenseeds.com | fontanaseeds.com