Picture this: You’re admiring your freshly painted everything-the-designer-rule-that-transformed-my-living-room-in-minutes”>Living Room when disaster strikes. A doorknob has created an unsightly hole in your pristine drywall, or perhaps moving furniture has left you with a gaping wound in your wall. The sinking feeling hits immediately – this means calling professionals, scheduling appointments, and watching your weekend plans crumble along with your wall.
But what if we told you there’s a revolutionary Method That transforms this nightmare scenario Into a quick 10-minute fix? A technique so effective that once you master it, you’ll never need to dial another contractor for small drywall repairs. This isn’t about temporary patches or obvious repairs that scream “amateur hour.” We’re talking about an invisible restoration that Leaves your wall looking as if nothing ever happened.
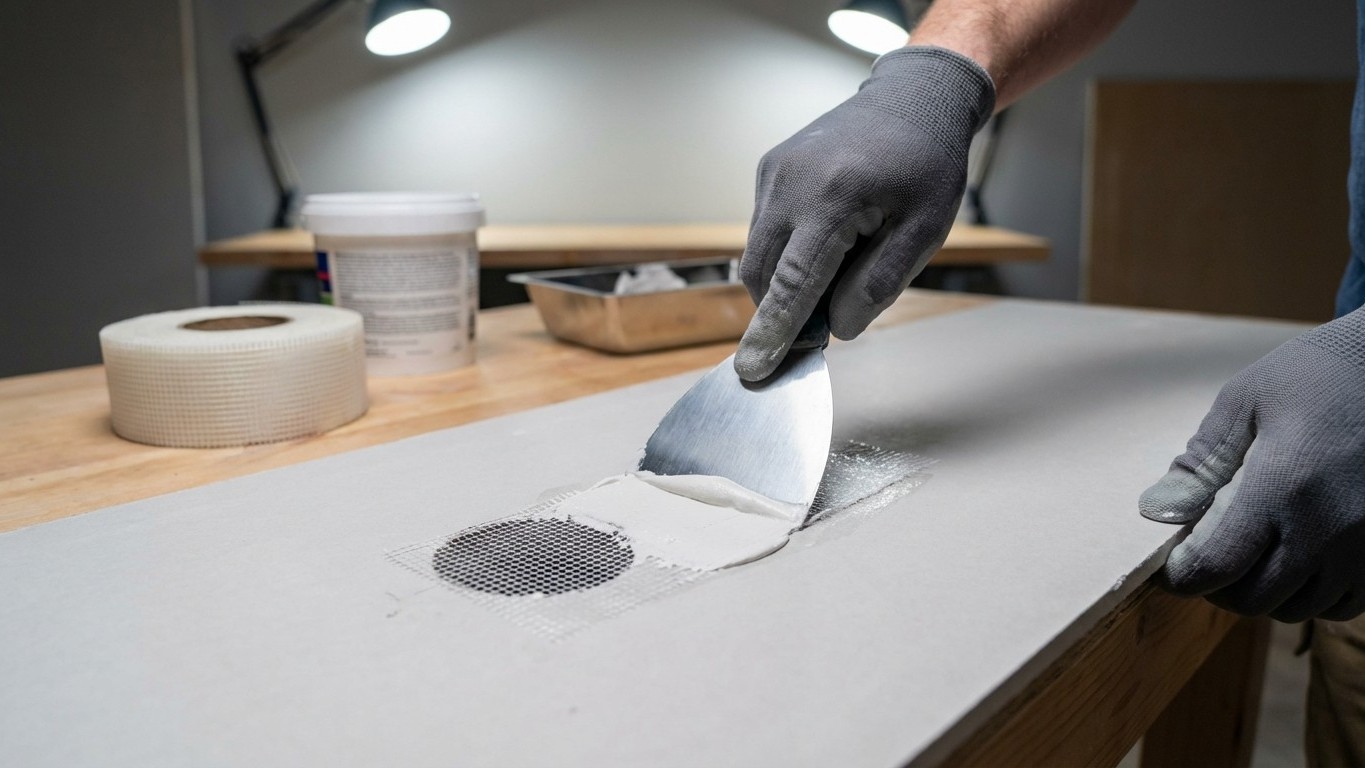
The Game-Changing Mesh and Compound Technique
Secret-trick-tailors-don-t-want-you-to-know”>The Secret lies in understanding how professional contractors approach drywall repair – but with a streamlined twist that eliminates the Traditional multiple-day process. This Method combines the strength of fiberglass mesh with the precision of modern joint compounds, creating repairs that are Actually-thrive-better-in-apartments-than-houses-the-results-will-surprise-you”>Actually stronger than the original wall.
The magic begins with self-adhesive fiberglass mesh tape, a material that has revolutionized the repair industry. Unlike traditional paper tape that requires multiple coats and extensive drying time, this mesh creates an instant foundation that bonds directly to the drywall surface. The open weave design allows compound to flow through and create mechanical bonds that traditional patches simply cannot achieve.
What makes this approach truly invisible is the layering technique. Instead of building up thick applications that create obvious raised areas, this method uses three ultra-thin coats applied with specific tools in precise patterns. Each layer serves a distinct purpose: the first locks the mesh to the wall, the second builds the foundation, and the third Creates the seamless finish that disappears under paint.
Step-by-Step Execution for Professional Results
The beauty of this technique lies in its systematic approach that eliminates guesswork. Start by cleaning the damaged area and removing any loose drywall debris. The key is creating clean, stable edges around the hole – jagged or loose material will telegraph through even the best repair work.
Apply the self-adhesive mesh directly over the hole, ensuring it extends at least two inches beyond the damage in all directions. This overlap is crucial for creating the structural integrity That Makes the repair permanent. Press the mesh firmly, working from the center outward to eliminate air bubbles that could create weak spots.
The compound application requires a specific technique that separates amateur repairs from professional results. Use a wide putty knife held at a 45-degree angle, applying steady pressure while drawing the blade across the mesh in smooth, overlapping strokes. The goal isn’t to fill the hole completely in one pass, but to work the compound through the mesh fibers, creating that mechanical bond that provides strength.
Professional Finishing Touches That Make All the Difference
The difference between a good repair and an invisible one lies in the finishing details that most homeowners skip. After the final coat has dried completely, the surface requires careful sanding with fine-grit sandpaper. The trick is using a sanding block rather than hand-sanding, which creates consistent pressure and prevents the wavy surfaces that betray amateur work.
Lighting plays a crucial role in achieving professional results. Use a bright, angled light source to reveal any imperfections that would become visible under normal room lighting. This inspection phase often reveals small ridges or depressions that require additional compound or sanding – details that separate invisible repairs from obvious patches.
The final step involves priming the repair area with a high-quality primer specifically designed for patched surfaces. This crucial step ensures uniform paint absorption and prevents the dreaded “patch flash” that can make even perfect repairs visible under certain lighting conditions.
Why This Method Changes Everything for Homeowners
Beyond the obvious time and cost savings, mastering this technique fundamentally changes your relationship with Your Home. Small damages that once required professional intervention become minor inconveniences handled in minutes rather than days. The confidence that comes from this skill extends beyond drywall repair – it represents a shift from dependency to self-sufficiency in home maintenance.
The materials for this method cost less than a single professional service call, yet provide enough supplies for dozens of repairs. More importantly, the speed of execution means damage can be addressed immediately, preventing the psychological wear of living with unsightly wall damage while waiting for repair appointments.
This invisible repair method represents more than just a home improvement Technique – it’s a pathway to true homeownership confidence. When you can transform wall damage from a major headache into a brief weekend task, you’ve crossed the threshold from homeowner to home master. The next time disaster strikes your drywall, you’ll reach for your tools instead of your phone, knowing that in just 10 minutes, your wall will look as perfect as the day it was installed.