After fifteen years of home improvement projects, I thought I knew everything about mounting pictures, shelves, and decorations on walls. I’d meticulously measure, mark my spots, and drill away, often creating a constellation of unwanted holes when things didn’t align perfectly. That changed completely when a seasoned handyman working on my neighbor’s kitchen renovation showed me a technique so simple yet revolutionary that I couldn’t believe I’d never encountered it before.
The revelation came during a casual conversation over the fence. I was struggling with a particularly stubborn gallery wall project, having already created several regrettable holes in My Living Room drywall. The handyman, overhearing my frustrated muttering, walked over and asked what I was working on. When I showed him my wall, dotted with misplaced holes and pencil marks, he chuckled knowingly and said, “Let me show you something that’ll change how you hang everything forever.”
The Paper Template Revolution
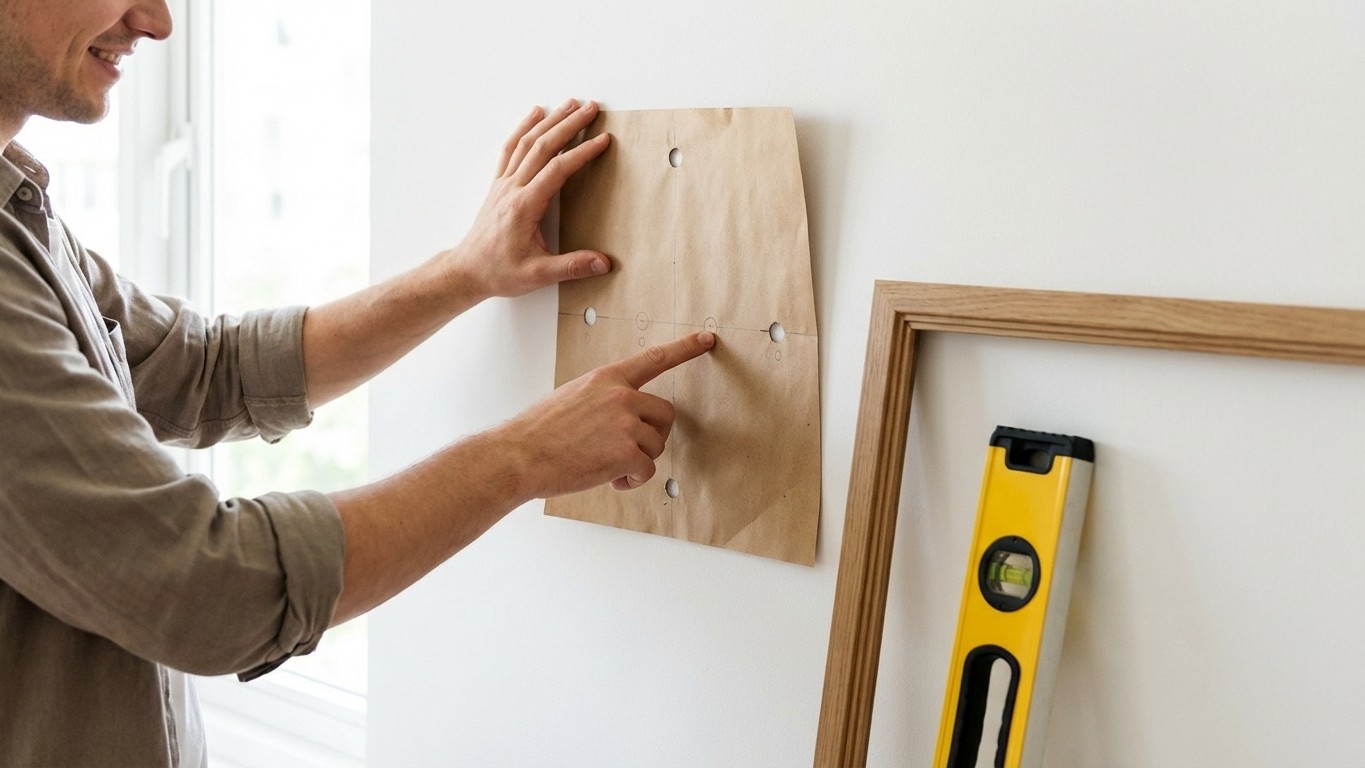
What he demonstrated next was elegantly simple: creating a paper template system that eliminates guesswork and virtually guarantees perfect placement on the first try. Using nothing more than kraft paper or even newspaper, he showed me how to create an exact replica of whatever I wanted to mount, complete with precise hole locations that could be tested and adjusted before touching the wall.
The process begins by laying your items face-down on the paper and tracing their outlines. For picture frames, you trace the frame itself, then carefully mark where the hanging hardware sits on the back. For shelves or brackets, you trace the mounting points. The key insight is that this paper becomes your testing ground, allowing you to visualize spacing, alignment, and overall composition without committing to permanent holes.
Once your template is complete, you can tape it to the wall and step back to evaluate the placement. This is where the magic happens – you can easily adjust height, shift left or right, or completely reconfigure your arrangement until it looks perfect. When you’re satisfied with the positioning, you simply drill through the paper template directly into the wall. The paper marks the exact spots, ensuring your holes align perfectly with your mounting hardware.
Beyond Basic Hanging: Advanced Applications
This technique extends far beyond simple picture hanging. Complex projects like installing floating shelves, mounting television brackets, or creating elaborate gallery walls become significantly more manageable. The handyman explained how he uses this method for kitchen backsplash installations, bathroom accessory mounting, and even outdoor deck railing projects.
For multi-piece installations, the template method truly shines. Instead of trying to measure and calculate spacing between multiple elements, you can lay out everything on paper first. This allows you to experiment with different configurations, ensure consistent spacing, and visualize how the finished project will look. Professional installers often use this technique for commercial projects where precision is paramount and mistakes costly.
The method also works brilliantly for seasonal decorations. Creating templates for holiday displays means you can achieve the same perfect arrangement year after year without the frustration of remeasuring and repositioning. Store your templates with your decorations, and next year’s installation becomes a simple matter of taping the pattern to the wall and drilling through the marked spots.
Professional Tips for Perfect Results
The handyman shared several refinements that separate amateur attempts from professional-quality results. First, always use a level when positioning your template on the wall – even if your individual pieces look straight, an unlevel foundation will make the entire arrangement appear crooked. Second, consider the wall material when drilling through paper templates. On drywall, drill slowly to prevent the paper from tearing, while on harder surfaces like brick or concrete, you might need to remove the template and mark the spots with a pencil Before drilling.
For heavy items, the template method becomes even more critical. Marking the exact locations of wall studs on your template ensures your mounting hardware will hit solid support where needed. This prevents the common mistake of discovering, mid-installation, that your perfectly spaced holes don’t align with the structural elements behind the wall.
The environmental benefits of this approach shouldn’t be overlooked either. Reducing mistakes means less spackle, fewer touch-up paint jobs, and decreased waste from damaged materials. Over time, this technique has saved me countless hours of repair work and helped maintain the integrity of my walls.
Transforming Your DIY Approach
Since learning this technique, my entire approach to home projects has evolved. The confidence that comes from knowing your holes will be perfectly placed the first time eliminates much of the anxiety associated with DIY installations. Projects that once seemed daunting – like creating a symmetrical arrangement of family photos or installing a complex shelving system – now feel entirely manageable.
The time investment upfront pays dividends in reduced frustration and professional-looking results. What initially seems like an extra step actually streamlines the entire process, eliminating the back-and-forth adjustments that characterize most amateur installations. Your walls stay pristine, your projects look intentional and well-planned, and you develop the kind of installation confidence that comes from having the right technique rather than just the right tools.