For years, I approached drywall patching like most homeowners do: slap some compound over the hole, smooth it out, and hope for the best. The results were always the same – bumpy patches that stood out like sore thumbs, requiring endless sanding and multiple coats to achieve anything remotely acceptable. That changed completely when I watched a seasoned plasterer work on My neighbor’s wall repair, and what he showed me transformed my entire approach to drywall maintenance.
The revelation wasn’t about using different tools or expensive compounds. Instead, it centered on a fundamental shift in technique that most DIYers never consider: building the patch from the inside out rather than piling material on top. This professional approach eliminates the common problems of shrinkage, cracking, and that telltale bump that screams “amateur repair job.”
The Foundation Phase: Setting Up for Success
The plasterer’s first move surprised me completely. Instead of immediately reaching for joint compound, he spent several minutes preparing the hole itself. Using a utility knife, he carefully cut away any loose or frayed Drywall around the edges, creating clean, straight lines. This wasn’t about making the hole bigger – it was about establishing a solid foundation for the repair.
He then lightly sanded the edges and wiped away all dust with a damp cloth. This preparation step, which I had always skipped, proved crucial for proper adhesion. The clean, slightly roughened surface allows the patching material to bond mechanically with the existing wall, preventing the dreaded scenario where your repair simply falls out weeks later.
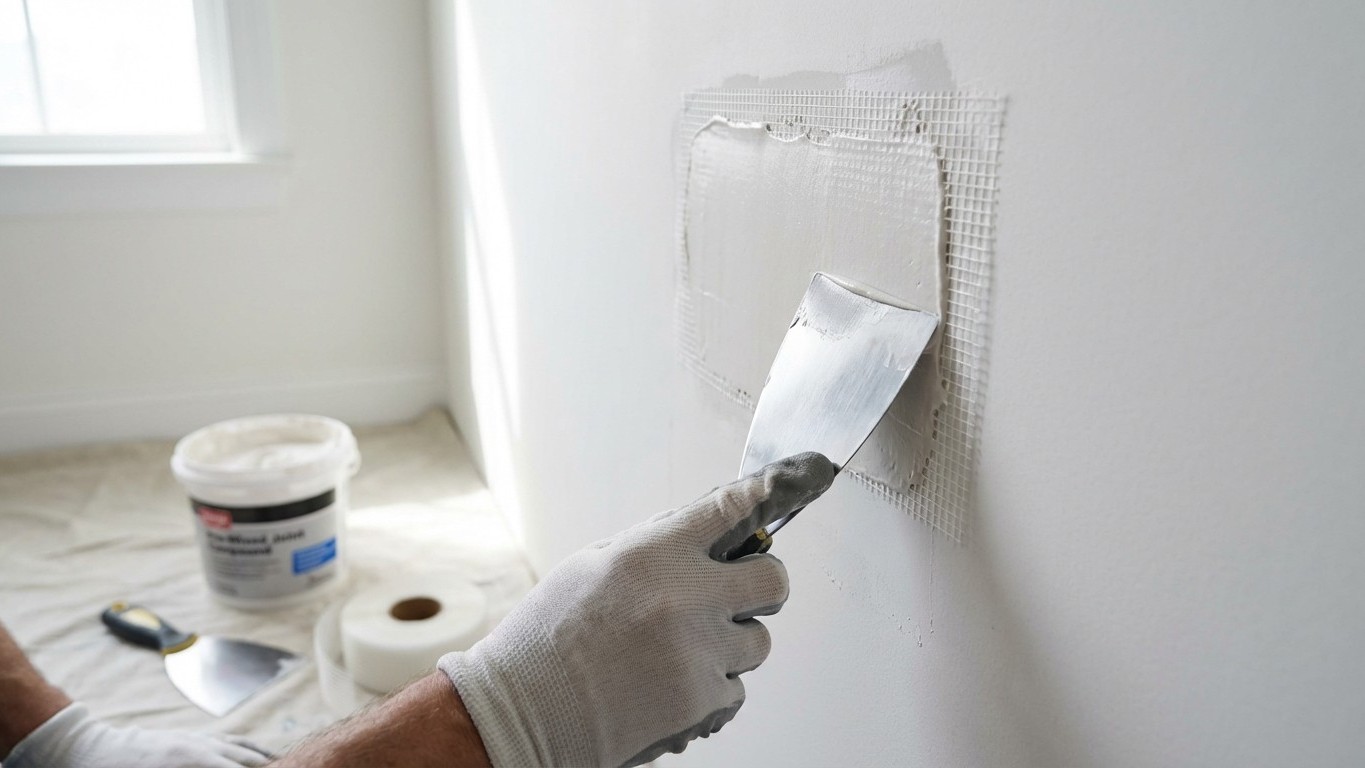
For holes larger than a nail hole but smaller than your fist, he demonstrated the mesh patch technique that revolutionized my repairs. Rather than Using the traditional paper tape approach, he applied a self-adhesive mesh patch that extended well beyond the hole’s perimeter. The key insight was positioning: the mesh needed to lie completely flat against the wall, with no air bubbles or wrinkles that would telegraph through the final coat.
The Compound Application Game-Changer
Here’s where the real magic happened. Instead of loading up a putty knife with compound and trying to fill the entire depression in one go, the plasterer used what he called the “feathering technique.” He started with an amount of compound that seemed almost too small, spreading it in thin layers that extended far beyond the actual patch area.
The technique involved holding the knife at a very low angle – almost parallel to the wall – and applying just enough pressure to spread the material while gradually lifting the blade as he moved away from the patch center. This created an incredibly gradual transition from the patch to the surrounding wall, eliminating the ridge that had plagued all my previous attempts.
What impressed me most was his patience. He applied three separate thin coats, allowing each to dry completely before adding the next. Each successive layer extended slightly further than the previous one, creating an imperceptible blend with the existing wall texture. The total thickness of compound over the patch was actually less than What I typically applied in a single heavy coat, yet the final result was infinitely smoother.
The Finishing Touch That Makes All the Difference
The final step revealed why professional repairs look so seamless while amateur attempts remain obvious. After the compound had dried completely, the plasterer used a technique he called “dust sanding.” Instead of Aggressive sanding that could damage the patch or surrounding wall, he used fine-grit sandpaper with the lightest possible touch, focusing on blending the edges rather than leveling the entire patch.
He held a work simple-rule”>light at a sharp angle to the wall while sanding, allowing shadows to reveal any imperfections invisible under normal lighting. This technique exposed minor ridges and bumps that would become glaringly obvious once the wall was painted. The gentle sanding motion followed the natural texture of the existing wall, maintaining consistency across the entire surface.
The plasterer also shared a crucial timing tip that had eluded me for years: the compound should feel firm but not rock-hard when you begin sanding. If you wait too long, the material becomes difficult to smooth, requiring more aggressive sanding that can damage your careful work. If you sand too early, you risk tearing or gouging the still-soft compound.
Beyond the Basic Technique
What elevated this lesson from simple instruction to genuine education was understanding the why behind each step. The plasterer explained how drywall compound shrinks as it dries, which is why thick applications often crack or create depressions. By building up thin layers, each shrinkage event is minimal and doesn’t compromise the overall repair integrity.
He also demonstrated how to match existing wall texture during the final coat application. Using a slightly damp sponge or texture roller, he recreated the subtle orange peel texture that characterized the rest of the wall. This attention to texture matching is what separates professional-looking repairs from obvious patches that stand out despite perfect color matching.
The transformation in my drywall repair skills was immediate and dramatic. Projects that previously required weekend-long efforts now completed in a single afternoon, with results that genuinely disappeared into the existing wall. More importantly, I gained confidence in tackling larger repairs, knowing that the fundamental technique would scale up effectively. Sometimes the most valuable lessons come not from complex tools or expensive materials, but from understanding the patient, methodical approach that separates professional craftsmanship from enthusiastic amateurism.