For years, I approached wall anchor removal like a demolition project. Armed with pliers, screwdrivers, and sheer determination, I’d yank, twist, and pry until the stubborn anchors finally surrendered – taking chunks of drywall with them. The aftermath always looked like a small explosion had occurred, leaving me with craters to patch, sand, and repaint. What I didn’t realize was that I was fighting against the anchor’s design instead of working with it.
The revelation came during a conversation with a professional handyman who watched me butcher yet another wall. “You’re doing it backwards,” he said simply, Before demonstrating a technique so elegant in its simplicity that I felt foolish for not discovering it sooner. The secret isn’t about force – it’s about understanding how these anchors actually work and using that knowledge to your advantage.
Understanding Your Enemy: How Wall Anchors Really Work
Most wall anchors function on a simple principle: they expand behind the drywall to create a secure hold. Whether you’re dealing with plastic expansion anchors, toggle bolts, or molly bolts, they all share this basic mechanism. When you insert them, they spread out or flip open to grip the back side of the wall. This is precisely why yanking them straight out creates such devastating damage – you’re essentially trying to pull a much larger object through a small hole.
The key insight is that many anchors can be convinced to collapse back to their original size, allowing them to slip out as easily as they went in. This reversal process requires patience and the right approach, but the results speak for themselves. Instead of gouging holes that require extensive patching, you’re left with barely visible punctures that can often be concealed with a simple dab of spackling compound.
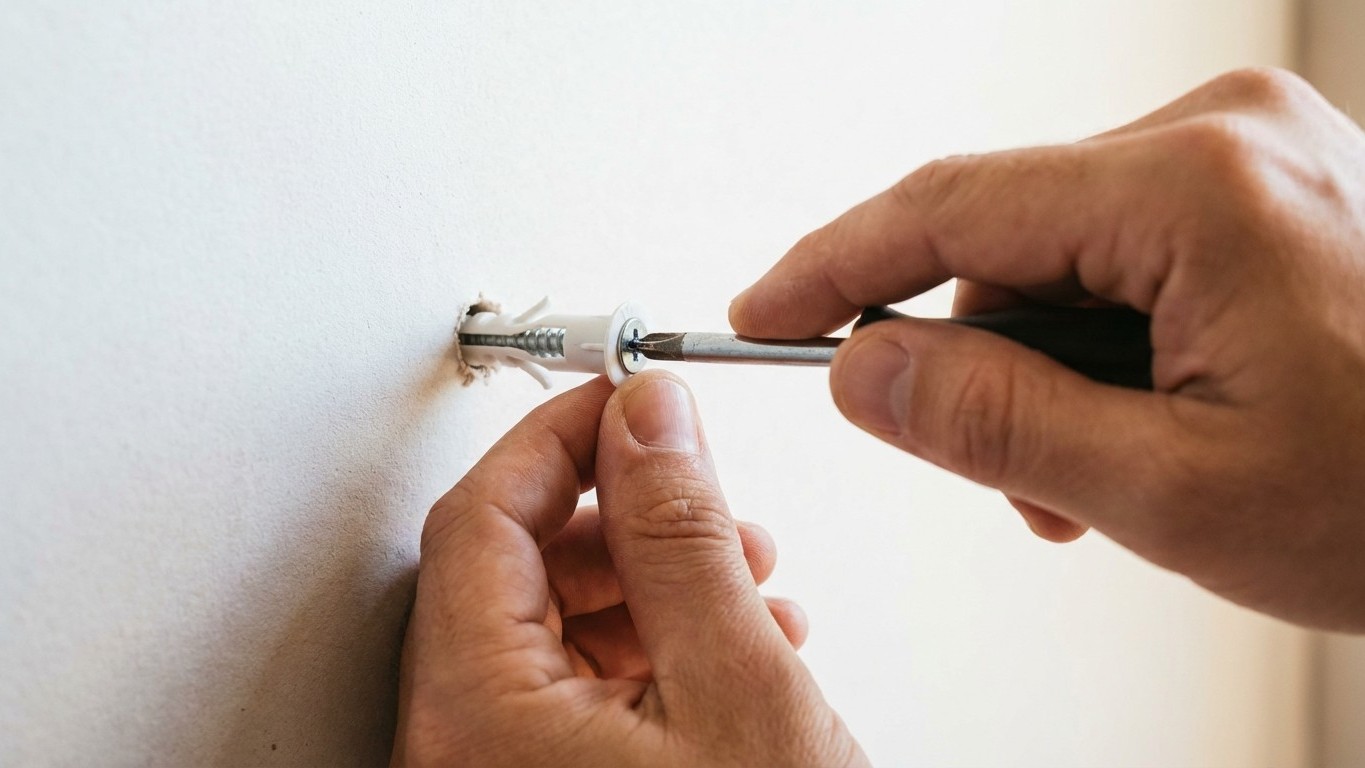
The Professional’s Zero-Damage Technique
The game-changing method starts with identifying what type of anchor you’re dealing with. For plastic expansion anchors – the most common variety – the trick involves using a screw to your advantage rather than fighting against it. Insert a screw partway into the anchor, but don’t tighten it. Instead, use the screw head as a handle to gently pull the entire anchor toward you while simultaneously pushing the screw deeper into the anchor itself.
This creates a fascinating mechanical advantage. As you push the screw in, it forces the anchor’s expanding segments to collapse inward, returning them to their original narrow profile. Meanwhile, your Gentle pulling motion guides the now-compressed anchor back through the hole. The timing requires a bit of practice, but once you feel that satisfying moment when the anchor suddenly gives way, you’ll never go back to the old destructive methods.
For toggle bolts, the approach differs slightly but follows the same principle of working with the mechanism rather than against it. These anchors feature wings that spring open behind the wall. The secret is to push the toggle bolt deeper into the wall cavity before attempting removal. This allows the wings to fall away from the back of the drywall, after which you can often pull the bolt straight out without resistance.
When Anchors Won’t Cooperate: Advanced Strategies
Some anchors, particularly older or corroded ones, refuse to play along with the gentle approach. In these cases, professional contractors employ a clever workaround that still minimizes damage. Using a utility knife, they carefully score around the anchor’s perimeter, creating a shallow circular cut in the drywall. This controlled scoring allows the anchor to be pushed slightly deeper into the wall cavity, where it can fall harmlessly behind the drywall rather than being extracted.
While this technique does leave a slightly larger hole than the collapse method, it’s still far superior to the crater-inducing yanking approach. The circular hole is clean-edged and perfectly sized for standard wall patches, requiring minimal finishing work. More importantly, you avoid the spider web of cracks and torn paper that often radiates from forcibly extracted anchors.
Prevention: Setting Yourself Up for Easy Future Removal
The best anchor removal strategy actually begins during installation. Professional installers always leave a small portion of the screw protruding from the anchor when hanging items. This seemingly minor detail provides a built-in handle for future removal, eliminating the need to drill out painted-over or flush-mounted screws. Additionally, keeping a simple log of what types of anchors were used where can save considerable detective work later.
When selecting anchors for new installations, consider removability as a factor. Some modern anchor designs specifically advertise easy removal features, incorporating built-in mechanisms that facilitate clean extraction. While these might cost slightly more upfront, they pay dividends when it’s time to redecorate or move.
The difference between destructive and damage-free anchor removal isn’t about having better tools or superior strength – it’s about understanding the mechanics at play and working intelligently rather than forcefully. Once you’ve experienced the satisfaction of extracting an anchor cleanly, leaving behind only a tiny hole that disappears with a quick touch of spackling, you’ll wonder why you ever Thought brute force was the answer. Your walls will thank you, and your future self will appreciate the time saved on unnecessary repairs.