Every spring, Gardeners across America toss thousands of rose branches into compost bins or trash cans, unknowingly discarding what could become an entire rose garden. Those seemingly worthless pruned stems contain the genetic blueprint for new plants, waiting for the right conditions to transform into blooming beauties that could grace your landscape for years to come.
The secret lies in understanding that roses possess an remarkable ability to regenerate from cuttings, a trait that has allowed these beloved flowers to spread across continents and adapt to diverse climates throughout history. when you prune your roses, you’re not just maintaining plant health—you’re harvesting potential new additions to your garden collection.
The Science Behind Rose Propagation
Rose stems contain specialized cells called cambium that can differentiate into roots under the right conditions. This natural process, known as adventitious root formation, occurs when hormones within the cutting respond to environmental signals like moisture, temperature, and darkness. Understanding this biological mechanism transforms what might seem like gardening magic into a reliable technique you can master with practice.
The timing of your pruning becomes crucial for successful propagation. Fresh cuttings taken during late Spring or early summer contain optimal levels of growth hormones and stored energy. These stems, still firm and green rather than woody, possess the vigor needed to establish new root systems. The key is recognizing which branches offer the best potential—typically those that are pencil-thick, healthy, and recently matured.
Successful propagation also depends on selecting the right portion of each stem. The middle section of a pruned branch often provides the ideal balance of maturity and growth potential. Avoid using the soft tip growth, which may wilt before rooting, or the oldest woody sections that struggle to generate new roots.
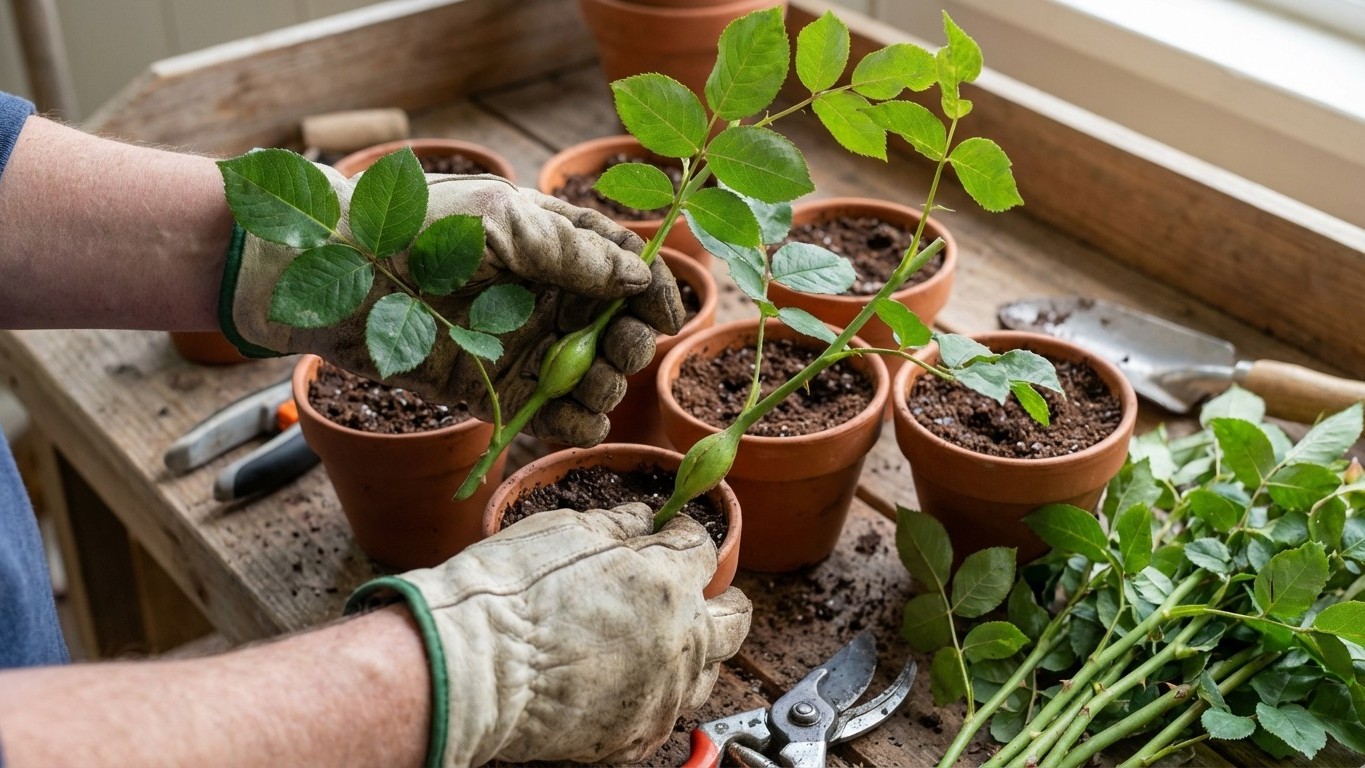
Creating Your Rose Cutting Success Story
Preparing your cuttings requires attention to detail that significantly impacts success rates. Each cutting should measure approximately six inches long and include at least three leaf nodes—the small bumps along the stem where leaves emerge. These nodes contain the highest concentration of rooting hormones and serve as the primary sites for new root development.
The preparation process involves making clean cuts with sharp, sterilized pruning shears. Cut just below a leaf node at the bottom and just above one at the top, creating angled cuts that increase the surface area for root emergence. Remove all but the top two sets of leaves, then cut these remaining leaves in half to reduce moisture loss while maintaining some photosynthetic capability.
Environmental conditions play a critical role in transformation success. Your cuttings need consistent moisture without waterlogging, bright indirect light, and stable temperatures between 65-75 degrees Fahrenheit. Creating a mini greenhouse effect using plastic bags or clear containers helps maintain the humid environment that encourages root development while preventing the cuttings from drying out.
Building Your Propagation System
The rooting medium you choose can make or break your propagation efforts. A mixture of perlite and peat moss provides excellent drainage while retaining necessary moisture. Some gardeners achieve remarkable success with plain water, allowing them to observe root development as it occurs. Others prefer commercial seed-starting mixes that offer consistent results and reduce the risk of fungal problems.
Patience becomes your greatest asset during the rooting phase, which typically spans four to eight weeks depending on rose variety and environmental conditions. Resist the urge to check for roots too frequently, as disturbing developing cuttings can interrupt the delicate rooting process. Instead, look for signs of new growth at the tips or the appearance of fresh leaves as indicators that root development is progressing.
Temperature consistency proves more important than absolute temperature values. Fluctuations stress developing roots and can cause promising cuttings to fail just as they begin establishing themselves. Consider using heat mats designed for seed starting if you’re propagating during cooler months or in unheated spaces.
From Cutting to Blooming Garden
Once roots reach approximately two inches long, your new rose plants can graduate to individual pots with standard potting soil. This transition requires gentle handling and gradual acclimatization to normal Humidity levels. Start by removing coverings for short periods, gradually increasing exposure over a week or two until the plants adapt to ambient conditions.
The first season focuses on establishing strong root systems rather than encouraging blooms. Pinch off any flower buds that appear during the first few months, directing the plant’s energy toward building the foundation for future flowering. This patience pays dividends when your propagated roses burst into bloom the following season with vigor that often surpasses their parent plants.
Your success with rose propagation opens doors to sharing these beloved plants with fellow gardeners, creating meaningful connections through the universal language of flowers. Each successful cutting represents not just a new plant, but a continuation of your garden’s story and a testament to the remarkable regenerative power hidden within those branches you once considered waste.